Monday, November 28, 2011

Thankful.


We had a great Thanksgiving weekend filled with lots of food, family and friends! I am so thankful for my amazing family, especially that we are closer to everyone. I'm also thankful for my awesome friends and my stinky puppy. I hope you all had an equally yummy Thanksgiving full of fun and relaxation (and maybe a little shopping).

Love giving thanks? Check out how Leah gives thanks everyday (and for every thing!) on her blog, Thx Thx Thx. Love it!

(source)

Monday, November 21, 2011

My Mama's Pumpkin Bars


Like pumpkin? Well you should probably be baking and eating these pumpkin bars right now. Yup, they are that good. This is my Mama's recipe and it is delicious. I finally baked these for the first time and they turned out great - very moist and pumpkin-y and the cream cheese frosting really makes them awesome. Hope you enjoy!

// 350 degrees // 25-30 minutes // makes 36 bars //

Ingredients
1 teaspoon salt
2 cups all-purpose flour
1 teaspoon baking powder
2 teaspoons ground cinnamon
1 teaspoon baking soda
4 beaten eggs
2 cups canned pumpkin
3/4 cup white sugar
3/4 cup brown sugar
1 cup vegetable oil
1 can cream cheese frosting

Directions
1. Stir together flour, baking powder, cinnamon, baking soda and salt.
2. Beat until combined: eggs, pumpkin, sugar and oil.
3. Add dry ingredients to pumpkin mixture, mix well. 
4. Spread batter in un-greased 15x10-inch baking pan. 
5. Bake at 350 degrees for 25-30 minutes,
6. Cool, frost and cut into bars. 


Sunday, November 20, 2011

Before + After: Bedroom Chair

First, let's talk about what's most important... Breaking Dawn was good. Not great, but good enough. My sister-in-law, Katelyn, and I pretty much laughed through a majority of the movie, but I still liked it. My expectations are just always low. That way I can never be disappointed. :)

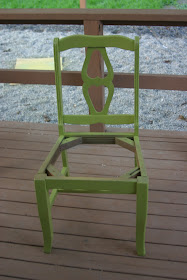
OK, on to the good stuff. I'm still on a re-use, re-purpose, re-cycle kick. I got this chair at Goodwill a while back for $10. Probably a little much for this chair, but it worked for me and I liked the mirrored heart detail on the back. It looked like it had already been re-used once before, too. Dark brown with some beige Hawaiian fabric. Not my style.


I sanded this baby down at the same time I did the side table. It was a lot easier that the side table though. Much easier.


I bought two cans of spray paint from Michael's in a lime green color called Ivy Leaf (Krylon brand in Gloss finish for $5-6/ea.). This chair is going in our bedroom, so I kept in line with the green color scheme. It was the first time I had spray painted anything, and I realized I wasn't that good. But who's good at anything the first time they do something? Except maybe Edward. I made it work - I probably could have done with only 1 can of spray paint, but I loaded this guy up. Making sure to cover every inch. I also probably lost a few brain cells in the process. Wear a mask, people!


After letting it dry for a few days, it was time to update the Hawaii 5-0 fabric on the seat. I already had some fabric left over from my pillow making adventure, so it didn't cost me a thing. I had to remove a bunch of little tiny nails to get the old fabric off. I know you are jealous of my miniature floral hammer. Zach definitely is.


Under the top fabric, I found some extra foam and duct tape. Comfy!


And then I found this awesome 70s yellow-gold floral fabric underneath. Classy! I decided to leave the foam/duct tape on over the top of the 70s gold fabric to give it a little more cushion. This chair is more for decoration (and hanging the occasional shirt or jacket), so it didn't have to be super comfy.


The fabric I wanted to cover the seat was a little thin, so I used some navy scrap fabric to cover it first to add some thickness.


I bought a new staple gun too! This guy was about $17 at Lowe's and worked great.


Round one of covering...


For the corners, I just gathered the fabric and tried to make it look as seamless as possible on the top.

Round two... I love it! I'm kind of obsessed with this fabric. So pretty.

And here's the final product. Isn't she pretty? Too bad she will probably be covered up most of the time. But when I do clean my room and actually put away my clothes, she will shine. (I mean... I always put away my clothes and make my bed, Mom). :)


Have you guys done any spray painting lately? Any re-upholstering? It's actually really fun! Next up for me is figuring out how to re-upholster this little winged-back lady.

Friday, November 18, 2011

Happy (Breaking Dawn) Friday!

Yes, today is the day! Breaking Dawn, Part I. I opted out of the midnight viewing this year... I'm getting too old for this stuff! But not too old for Twilight in general. Never too old for Twilight. I'm going with my sister-in-law Katelyn to see the new one tonight at 8!

I'm super excited for the new movie, aren't you???

To get in the festive Twilight spirit, I thought it'd be fun to take a trip down memory lane... the ghosts of Twilight past, if you will. Here's my sister-in-law, Jenn, and I before the New Moon premiere (we got to see it at 9pm the night before it came out with our "special" passes we got for spending so much money at Nordstrom). Yeah, we're kind of a big deal.

And here's me with Edward and Jacob at Nordstrom when we got our passes. Can my grin get any bigger?

Here's my sister-in-laws, Jenn and Bethany, before Eclipse sporting our awesome Twilight-appropriate shirts.

And here's Edward. Hanging out in my cube at work. He drops in sometimes (you may remember him from here).

No big deal. :)

Have you guys seen the new movie yet? Thoughts? Opinions? How is the acting? Any hope for the Oscars? :)

Have a great weekend!

Tuesday, November 15, 2011

Homemade Brownies


The Mister and I love some good dessert (thus, all my cookie baking) but sometimes when I don't want to make four dozen cookies, brownies are a great substitute! Especially when you just use the box mix (our favorite is the Ghirardelli double chocolate brownie mix from Costco. Can't go wrong with bulk!

The other night we wanted a quick snack so I decided to make some homemade brownies since we were all out of mix. It was pretty easy, and the recipe I used was quite tasty too. Here's the recipe from my good old trusty Better Homes & Gardens Cookbook:

// 350 degrees // 30 minutes // makes 16 brownies (or 9 if you are like us) //

Ingredients
1/2 cup butter
3 ounces unsweetened chocolate*
1 cup sugar
2 eggs
1 teaspoon vanilla
2/3 cup all-purpose flour
1/4 teaspoon baking soda
1 cup chocolate chips (optional)

*Note - if you don't have any unsweetened chocolate on hand, you can substitute (like I did!) 9 tablespoons cocoa powder plus 3 tablespoons cooking oil. Conversion is: 3 tablespoons cocoa and 1 tablespoon cooking oil  = 1 ounce unsweetened chocolate.

1. Melt butter and unsweetened chocolate (or substitute conversion) over low heat, stirring constantly. Remove and let cool.
2. Grease an 8x8 pan.
3. Add eggs, one at a time, beating well after each addition.
4. Stir in vanilla.
5. Stir in flour and baking soda.
6. Add chocolate chips (this makes them so much better!)
7. Spread in pan and bake for 30 minutes.

These ones turned out great. Not too doughy, not to crunchy. Just right.


We also love to bake our brownies as cupcakes too! My friend, Amanda, gave me this idea and I think it is genius! I actually like them a lot better this way because each brownie cupcake bakes evenly. You don't get the edge brownies that are super crunchy while your middle is all gooey. I even like to put a mini Reese's in there every once and a while too.


Monday, November 14, 2011

Before + After: Mid Century Side Table

I've been on a re-use, re-purpose kick lately. In fact, I'm kind of an addict. Hitting up the local Goodwill and thrift stores to find some cheap furniture that I can paint and re-use. Another man's treasure, right? Because you have to admit, furniture is Ex. Pen. Sive. So being the cheap-o I am, mixed with my need to have a project, it is a perfect fit!

I bought this little mid-century side table at Goodwill for $12.99 a while back. It's solid wood and just had a few scratches and dings - perfect for what we needed for the end of our split apart sectional (can you see the open edge in the picture above? Our little living room is too small for our large sectional and it was driving me crazy).

I decided to sand and stain (instead of paint) the table a color close to the original because I liked its rich brown goodness. Plus, we already have a yellow side table so I didn't want too many colors going on.

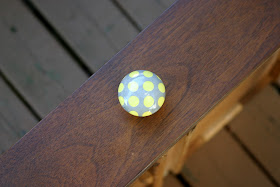
First things first, I had to put a handle on it so we could use the little drawer (turns out we never actually use that drawer anyways). I remembered that I had bought at Michael's a while back some cute little knobs for $1 each in their dollar section (seriously, sometimes you can get the best stuff on the cheap in the dollar section).


The only problem was the hole in the drawer wasn't quite big enough. Cue the power drill.


Pretty simple... I got a drill bit that matched the size of the knob and drilled away.


Step one... check! Step two - sanding. To start, I borrowed my parents belt sander, as well as their oscillating tool, and sanded that puppy down (after removing the knob, of course). I hate sanding. H.A.T.E. The tools make it easier, but it's still not my favorite thing. I forgot to take pictures at this point, but found some pictures of this baby all sanded down, and it was fresh and clean and primed for staining.


Step three - on to actual staining. This was quite the experience. I really didn't have a clue what I was doing, so I did, what else? Read the instructions on the can of stain. I ended up getting Minwax two in one - stain and top coat (less work for me hopefully) in Mission Oak. Put it on with a cheap paintbrush and tried to apply the coats as evenly as possible.


After two coats, some touch ups, and a couple days of drying outside, we were back in business. It turned out pretty well except I am not the greatest at sanding. You can see some of the spots where I got tired and went opposite the grain and a little too deep. Oh well. That part will probably be covered most of the time, so I'm not worried. 


And here's the finished product. I like it a lot. Still has the same rich color, just a little more gussied up.


Tuesday, November 8, 2011

Locks of Love


While we were in Paris, we saw two different bridges that were covered in locks (one by the Louvre and one by Notre Dame). I had read about this on a blog before we left for our trip (find it here and more on it here) and thought it was sweet. It's a tradition for lovers to write their names or initials on the padlock, fasten it to the bridge, and throw the keys in the river to declare their love. Pretty corny... but also pretty awesome! Of course I wanted to do it.


It wasn't until our last day in Paris after we got back from Versailles that we found a lock along the Seine at one of the Bouquinistes (Parisian booksellers), engraved our names and attached it to the Pont de l'Archeveche near Notre Dame. We put our names and the date on the front, our wedding anniversary and dating anniversary on the back, and Kane along the bottom. We filled that thing up!


We share a spot right next to Carlye and Dameon. :)


In true Kane fashion, we were giving a little smooch as we dropped the keys in to the Seine, only to hear a big "thunk." We look down and the keys had landed on the edge of the bridge. Cue big boat coming towards us and as we use our umbrella to try and push the keys in to the river before the boat reached the bridge. Go us! The things we do for everlasting love... :)


Now our love will be in Paris forever! (Or at least until they take all the locks down again...) :)