Photobucket Photobucket Photobucket Photobucket
Showing posts with label Chairs. Show all posts

Tuesday, May 20, 2014

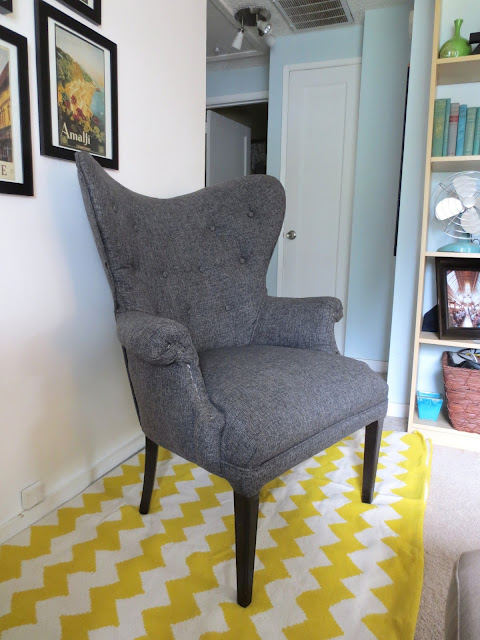
Upholstered Gray Chair... Finally Done!


Well, almost two years after I purchased this chair, it's finally finished. Stick-a-fork-in-it finished. Wait, you say. Didn't you already finish this chair (ala this post)? Well, yes. Yes, I did. Almost... We finished everything but the detail on the front of the arms and around the back along the edge. 

I finally got my act together and decided to go with some nail head trim. The original had some wood detailing on the front of the arms, but it was damaged and irreparable. The arms are too curved and unique in shape to try and recreate the wood piece myself, so nail heads it was! I'd done nail head trim before on our Queen Headboard (post forthcoming) with individual brads I got from Lowe's. I had seen this nailhead trim at JoAnn's which looked much easier to use since all the brads were connected. Um, no brainer! And with a 50% off coupon on my JoAnn's app (it is my goal to never pay full price for anything at JoAnn's or Michaels!) it was a great deal. 

The trim has actual nails every five brads so there is much less time spent nailing and the brads are also evenly spaced, which makes it much much easier and faster to put on the chair. It's also somewhat bendable, which helped for the front arm detail. I just molded it to the shape I wanted and made sure to nail in the brads where they would stay put. Easy peasy. 

If you look closely, you can see the difference between the trim and the brads that you actually nail in, but not unless you look really closely, which no one probably will. :)


I'm glad I finally finished this bad boy! Such a handsome chair (for my handsome husband). Good to know there is another alternative out there besides having to nail in 100 individual brads!

See this post for a DIY in pictures of how we reupholstered the chair and this post on how we picked the fabric.

Wednesday, July 10, 2013

Reupholstering a Chair... in Photos


Remember when I told you guys about this awesome chair I found at a thrift shop in Centralia about 9 months ago??? No? Well, I don't blame you because yeah, it was 9 months ago. But, it's finally finished! Well, almost finished. I still need to work on some finishing touches (the arm details, side panel stitching, and the back finishing along the curved detail - more on that below).

I fell in love with the shape of this chair right away. Check out those curves and the tufting. Mmmmmhmmmm. By default, this is technically Zach's chair since I already reupholstered my own wing back chair last May. While I used a bright, fun patterned fabric for my chair, I wanted to use more of a solid, sophisticated (and manly) fabric for Zach's chair. See my previous post about how I decided on the charcoal gray fabric.

After the rosy pink chair sat for a few months in all it's pink glory, we finally decided to get on it in early December. I used the same methods for this chair that I did with my wing back chair (check out Part 1 and Part 2) with some adjustments when we put it back together since there were some other challenges (hello curved shoulders PLUS tufting!). 

For this post I wanted to do more of a photo tutorial since I think every re-upholstery project is different. I'm hoping this photo tutorial gives you a guide of what to do and then allows you to tweak your method to make it easier for you and your project. Here we go!


Still working on the finishing touches. As you can see, the front of the arms needs some finishing details. It originally had a curved wooden piece on each side, but one was damaged and I think I might explore using re-upholstery brads instead. The back also needs to be finished (above, middle). Originally, it had some color-coordinated rik rak glued on to cover the staples, but I'm also thinking of using brads here too. The above right photo shows a little gap on the side (right above the leg) that just needs to be stitched together with coordinating thread.

So, like I said, not completely finished, but for our purposes (especially since baby will be here soon!) this bad boy is probably done for now.

Some additional notes on this project:
- If you have a curved wing back like I did, make sure to cut the piece of fabric with plenty of extra room since you have to cut the fabric and work with it to bend around the curves (see the cuts we made in Step 11 above).

- Be prepared to reinforce the chair with whatever method works for you, especially if it is an older chair. We used some leftover chicken wire and some nails with ours. :)

- Tufting is hard. Tufting + a curved back is even harder! We started in the middle/bottom and worked our way up as we pulled the fabric tight around the curves. Take your time and make sure there is no bunching. It also helped us to use the original pink fabric as our guide and put pins on the gray fabric where the buttons were supposed to be so they lined up easily.

- If you do nothing else, at least 1) take photos before you start 2) take notes as you take it apart for ordering 3) label the pieces you take off so you know where to put the new fabric back on. From there, you can probably figure out the rest by trial and error (and a lot of staples).

Here are some more photos of the (almost) finished chair - we love it!


I'll be sure to update you when I complete the finishing touches... hopefully soon, but with moving and baby girl, who knows!

Tuesday, October 30, 2012

Oops... I Did It Again


I played with your heart... I bought some more fabric. Oh yeah yeah. That's as close to Britney as I'll get. :) 

Sunday I went down to PDX with my mom to see my grandparents (and my brother was there too - hi dude!). Apparently my Grandma wants to get on the Facebook. She's 87 and barely knows how to turn on her computer. But I fully support it! Go Grandma Go!

After our visit, we stopped by Fabric Depot, one of my favorite places to get fabric. Great discounts and tons and tons of fabric. I love it. I grabbed a ton of samples and had a hard time deciding! I knew I wanted navy or charcoal gray, so I started there. So many choices...

I really want this chair to be classic. I love the unique shape of it and think the shape alone is enough to make it stand out. Since this is technically Zach's chair, he wanted a manly fabric with some texture and a solid color. I was in agreement too, especially since I already have my wing back lady I reupholstered back in May with a bright fun pattern. 

So what did we settle on? We got the one on the far right! It has great texture, is pretty thick and the color is amazing. Here's another close up and then below is the fabric from afar. It looks a lot lighter in the bottom picture, but it's definitely a deep rich charcoal and I love it (and so does Zach)!


See how there's just enough texture to keep it interesting, but hopefully still solid enough to let the shape of the chair and the tufting stand out? I think we made a good choice. 

As for cost... I got six yards at $21.99/yard, plus 35% off with my Mom's coupon (thanks, Mom!), plus no sales tax(!). Total cost - $85.76. Not too bad. A lot cheaper the other wing back chair fabric, but I ended up getting an extra yard of fabric for this one since there's a lot of piping and we'll need to cover the tufted buttons. 

I love it. I got home late Sunday night and Zach already wanted to get started taking the chair apart. I was like, Whoa there buddy. Calm down. But I did like his enthusiasm. Hopefully we'll find a free weekend to take this guy apart soon. Right now he looks like a lady chair, but I can guarantee he'll be a masculine hunk of curvy tuftedness by the time we are done with him. 

Monday, September 24, 2012

Weekend in Instagrams & Happy Birthday Mama!

How was your weekend? We had a lot of fun this weekend with our families, first on Friday night we hung out with Zachary's family. His grandma came all the way from Napa, CA to visit for the week. We had a great time at Z'Tejas for dinner - a southwestern/mexican restaurant with yummy cornbread!

Saturday morning we went over to my parents house in Centralia for my mom's birthday. While the boys watched football, my mom and I went to downtown Centralia to hit up the antique shops (Centralia is quickly becoming one of my favorite places for great vintage and antique finds!).

First we went to Chehalis to this AMAZING fabric/quilt shop. Tons and tons of color coordinated fabrics line the walls. I love it so much, but at the same time, it's kind of overwhelming because there are so many choices! I've been trying to find some fabric for Zach's mom to make me a quilt and finally settled on getting a jelly roll in some colorful vintage patterns. I want to do a herringbone style quilt and can't wait to see the result (I'll keep you posted).

From there we went to the main street downtown to hit up some of our favorites (this is the third time we've wandered down there this summer). The first stop we went into I found this vintage Coca Cola crate for $9! I was so excited because 1) I'd seen a very similar one the first time we went antiquing - I didn't get it and had been dreaming thinking about it ever since. 2) Other crates like this I'd seen were upwards of $25-30, so I thought it was kind of a steal.

The second store we went into I found the globe for $15! Seriously, it was my lucky day (of course, when I am on the spending diet... oops! This was my "cheat day" I guess...). I snatched it up just in time for us to hit the next shop where I found an equally awesome globe for only $10. That was the lowest price I'd seen on a globe recently, so naturally I had to buy it. :)

Also, at the first store they had a ton of old Schwinn bicycles out on the street. I was seriously thinking about getting one. The one I wanted was a blue one, with a basket of course, and it was $120. Maybe they'll still be there next time we go...

My favorite find of the day was this amazing pinky mauve tufted wing back chair. It was love at first sight, but I was good and waited on it. By the time I got home, I couldn't stop thinking about it and decided to see if the store was open the next day. It was quarter past five and they closed at six so (with permission from the hubby) we raced back down to the store. The CLOSED sign was up on the door, but I decided to try it anyways since it was only 5:30, and thankfully it was still unlocked! I went in and asked the girl at the counter if we could look at the chair again and she said yes. We went back to look and it was just as I had remembered. Check out those wide curved wings and the tufts. I die. It was $58, which I thought was a good deal for the condition and the uniqueness of it. I decided to try to get them down on price and it worked! I saved $3! Haha. Gotta start somewhere, right? :)

Long, long story blog post short, I got it and it's wonderful and I can't wait to make it my next project!

We also made some homemade peach pie (recipe coming soon) and went out to birthday brunch at Judy's Country Kitchen. I love my family and we have a lot of fun. :) And the pups were happy to see their Uncle Aaron and get spoiled by the grandparents. Happy Birthday Mama!


Wow. That was kind of a lot. I don't blame you if you skipped all the words. I hope you all had a great weekend! 

Friday, June 1, 2012

Re-Upholstering a Wing Back Chair, Part 2: Putting it Back Together

Happy Friday! It doesn't feel like Friday because of my short week, but I'm sure glad it is! Before we get in to how I finished the wing back lady, here are some reference posts for the whole re-upholstery process.

Choosing Fabric
Before + After
Step 1: Taking it Apart

Now let's put this bad boy back together...

 STEP 5: SPRAY PAINT 
Next up are the legs. Meow. Look at the legs on this lady. They had all the right curves but no pizazz. I used some left over spray paint (from this project) in Rust-oleum Metallic Oil Rubbed Bronze. It actually turned out to be more of a deep dark brown with a little metallic shimmer in the sunlight. I love it!

 STEP 6: NEW FOAM! 
After the deconstruction, we realized that a lot of the foam was really worn down. So much that you could feel the wood beneath it. Off to Joann's I went and luckily over Memorial Day weekend they were having a 50% off sale on all foam! I got 2 1/2 yards of 1/2 inch thick foam and it was just enough to cover the arms, wings and the front bottom portion (the seat cushion and the back were still in good shape). I didn't cut the foam exact, but enough so I could staple it where I needed to and then cut off the excess. On the bottom front piece, we had to cut the corners and then use the hot glue gun to get the corner piece to stay.


 STEP 7: CUTTING THE FABRIC 
This part took me forever. There are a lot of things to consider before you start cutting. For instance, does your fabric need to be lined up (like stripes)? Do you have enough fabric? Do you want certain parts of the pattern to show? Thankfully, mine didn't completely need to get lined up, but I did want some of the bigger pieces of the pattern to show up on the back and the seat. I wasn't sure at first that I would have enough fabric... so I didn't care if the pattern showed a certain way. But after I rolled it all out I realized I had plenty of fabric (almost a yard left over!) and I was a little more picky with my placement.

The method I used to cut the fabric was very scientific. I measured each edge and angle to get the perfect cut. Well, not exactly. :) I used the original fabric pieces as a guide, then pinned them to the new fabric where I wanted and cut out each piece. I kept the old fabric pinned and labeled to the freshly cut fabric until I was ready to put it back on the chair. We also saved all the other fabric pieces that were sewn to the pretty pieces to reuse (they were for extra reinforcements when stapled back to the chair).


 STEP 7: SEWING THE FABRIC 
This part I can take no credit for. Absolutely none. My mother is a saint and a bad ass seamstress. She did all the piping and the whole cushion! She's amazing! I definitely couldn't have done this part without her! The piping by itself was really easy - we just cut 1 1/2 inch strips and reused the cord from the chair. But, the cushion was a little more tricky. The piping was factored into the cushion fabric so there was a lot of crazy folding and seams. I won't go in to detail, but it was a tricky little beast. But she did it! And it turned out so good!


 STEP 8: STAPLING 
After everything was cut and ready to go, we put the lady back together. I looked at my notes, started with the last piece we took off, and went from there. Once we got going, it actually went pretty fast (so fast, I forgot to take a bunch of pictures...). Just a bunch of staples and a little bit of hammering to get them flush to the wood and it worked like a charm. Just pull the fabric, staple, hammer, repeat. It's that easy!


Viola! Done! I think it's pretty obvious that I love how it turned out. It's so much fun and bright and cheery! I love looking at it.

It's amazing seeing it all come together after a lot of hours of hard work! Have you done any bigger projects recently where you feel really satisfied when you are done?


Wednesday, May 30, 2012

Re-Upholstering a Wing Back Chair, Part 1: Taking it Apart

Since I'm declaring the rest of this week "Re-Upholstery Week," let's get on with it already!

I should give a little disclaimer here. This is based on my experience in re-upholstery. I am in no way an expert, I just like to tackle projects and figure them out as I go. I did reference a lot of other blogs (I'll share those with you later on) and they helped me tremendously to figure out where to start and what to do next. 

First up is taking the beast apart. This is the fun part and probably the easier part. Who doesn't love demolishing things and taking them apart?

 STEP 1: BUY YOUR FABRIC 
Remember this post about how I chose my fabric? That was probably the hardest part! :) I think it's easiest to choose a busy print with no certain direction so it's easier to line up the pattern (for instance, if you used stripes you'd have to make sure every line matched up or it would be totally noticeable). The guide in the post is really helpful in deciding how much fabric you will need, too.

 STEP 2: TAKE LOTS OF PICTURES 
The best piece of advice I can give you for the entire re-upholstery process is to take lots of pictures. Take pictures before you take it apart. Take pictures while you take it apart. This is really important because at least in my case, the pictures acted as my guide to putting the chair back together. Get all the weird angles and funky seams photographed because believe me, you will forget by the time you put it back together!


 STEP 3: GATHER YOUR SUPPLIES 


You'll need these supplies at one point or another throughout the whole process. To start, you'll primarily need the pliers, a screwdriver, masking tape, and a sharpie (or other writing utensil).

 STEP 4: TAKE IT APART! (AND TAKE NOTES) 

Along with taking pictures, I would say take good notes too. At least write down what order you took each piece (or section) off in, that way when you put it back together you just need to reverse the order.

Find the top layer (the last piece that was put on) and start peeling it away (very carefully, of course - we're dealing with staples here!). With this chair, it was the back piece that came first (actually, I guess it was the bottom piece if we get technical). It's actually really fascinating to see how a chair is made and put together (and kind of shocking how my chair at least was so piece-meal). Buster really wanted to help out too. :)

As far as how we took it apart, our method consisted of prying the staples off the chair with the flat head screwdriver, then using the pliers when needed to get the full staple out (sorry I don't have a better picture). Oh, and don't forget the muscle! :)

After we took each piece apart, I labeled each piece with masking tape which side and where it belonged on the chair. This was also really helpful when we went to put it back together.


OK, I think you get the picture. Lots and lots of pictures. Take them. Trust me, you'll be glad you did!

Taking the chair apart is probably the most important part of the process because it's how you learn how to put the chair back together. You know, Humpty Dumpty style.

Tomorrow we'll put this baby back together!

LinkWithin

Related Posts Plugin for WordPress, Blogger...