Photobucket Photobucket Photobucket Photobucket
Showing posts with label Pillows. Show all posts

Wednesday, July 3, 2013

DIY: Home is Wherever I'm With You Pillow


Sad news. My best friend, Kim, is moving across the country. :( For three years at least. It makes me sad. To be fair, I did move halfway across country to Arizona two years ago, so I guess we're even? 

No, seriously, I am so happy for Kim and her hubby, Jake, to embark on their next adventure. I can speak from experience when saying moving to a far away place can be scary, but also an amazing growing experience with fun new adventures to be had!

We had our farewell dinner last week at this amazing little restaurant in Seattle called Pasta Freska. You are seated and then the Chef comes to your table and asks you if there is anything you can't eat, don't like, etc. I said no fish, Kim and Zach said not too spicy and Jake said bring it on! No menu, no prices listed. He just brings you a bottle of wine (and a Raspberry Lemonade for the prego) and the first course begins! Such a cool experience and everything was so delicious. Brought us all back to Italy! I think in all we had about 7 courses including dessert. It was a little spendy, but well worth it for a nice dinner out to celebrate awesome friendships! 

So, back to the pillow. I wanted to send them off with a sweet going away gift and have always loved the "Home Is Wherever I'm With You" quote from this song. Further evidence here that I love it and how relevant it was to us when we moved to Arizona (and to Kim and Jake now that they are moving to Charlotte.

Luckily, I had everything on hand for this project, it was just a matter of putting it all together, which was super easy!

Supplies:
Fabric
Felt
Fiberfill
Embroidery thread
Scissors
Needle
Sewing machine with matching thread

Step One: Print out your quote in the font you want. Cut out the paper letters individually first.

Step Two: Cut out your fabric in two square pieces the same size. If you are using fiberfill, you can make it any size you want. If you have a pillow form, measure the form and cut accordingly. I made mine about 17 inches square.

Step Three: Cut out the felt letters. 


Step Four: Play with the placement on your pillow.


Step Five: Start stitching! I started with the bottom row to make sure there was enough space along the bottom. I used a simple running stitch on each letter with three strands (half) of the embroidery thread. 

Step Six: Sew the pillow together using a straight stitch with your machine. I used navy thread that blended in quite nicely. Make sure to leave a good 5-6 inch gap at the bottom so you can stuff your pillow. 

Step Seven: Turn the pillow inside out and stuff with fiber fill. Make sure to get into the corners really well. I didn't stuff it too full because I wanted it to be comfy and soft. 

Step Eight: Sew up the pillow using a hidden stitch. I used the navy thread and didn't have to be that careful since it blended in. 


Don't you love it? Modern and simple. Perfect for Kim's style - and she loved it too! Such and easy project, I think it took me two nights while watching TV. Not bad at all. I kind of want to make one for myself now! :)

We'll miss you Kim and Jake!!!

PS see more of my pillow projects here!

Monday, November 5, 2012

Knit Pillow

Now that Fall is definitely here, I have the knitting bug again. It's funny how that works. I have no desire to really knit anything in the summer. But come fall, I'm all over it. My first project of the season - a knit pillow cover! I first saw this idea on my trip to West Elm a month or so ago. I loved it, but I didn't want to pay for it. I think it was around $34 for the pillow cover alone!


So of course, I decided to make my own! I recently became reacquainted with the website Ravelry. Have you heard of it? It's an online community for knitters and crocheters (my username is meganykane if you want to find me!). There are a ton of free patterns and that's where I found the pattern for my pillow.

I used this pattern - the Simple Stitch Pillow by Meg Roke Knits. I have to say, it's one of the easiest knitting projects I've done so far! I used thick yarn and thick needles so it went pretty fast, and since it is a pillow cover, I just put it on a pillow I already had lying around.

Needles - Size US 15 (10mm)
Yarn - Bernat Brand Bulky 80% Acrylic/20% Wool in Low Tide
(I bought three skeens on sale for $4.11/each, but only ended up using two for this project)

I followed the pattern pretty much spot on and it was so easy. No complex parts to it at all until you get to the button holes, which was only one row.

The other great thing about the pillow is I got to use some vintage wood buttons that my Mom gave me. She said the my great grandfather made them! How cool is that?!

OK, here she is. She is super soft and cuddly. Now I just need to keep it away from the puppies! I love how it turned out!


The best part is I can take off the pillow cover when it gets hot in the summer. I love it!

What knitting projects are you working on these days? I'm thinking of trying to tackle a scarf like this one if I can find a similar pattern. I got the teal version and it's so cozy warm!

Thursday, June 21, 2012

So... I Made Another Pillow

Apparently I have a thing for pillows and frames. So I made another pillow. Maybe I need to make pillows like Snooki needs to go tanning. I don't know. I found an extra pillow form in our junk room office and thought I should make a quilted pillow. When my mom came over to help me with this project a couple weeks ago I asked her to bring her Accuquilt fabric cutter so I could, yes, cut some fabric. It's the coolest machine. Very simple but gets the job done.

I didn't actually use fabric. Instead, I used two flat sheets from Wal-Mart for $5 each (actually, I had to buy the navy twin sheet set for $9.99 because they were all out of the plain flat sheets). A lot more yardage for your money, although the fabric was not great quality. Since this was my first real "quilting" project in a while, I didn't mind using fabric that wasn't great. I considered it almost a practice run for other future projects. :)

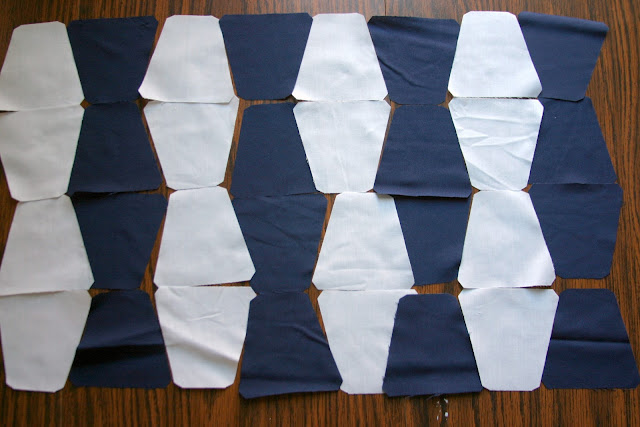
The Accuquilt is pretty sweet. You can put up to six layers of fabric on the dye-cut to roll through the machine. I wanted to try out the tumbler pattern to make a sort-of honey comb pattern, but they also have tons of other dye-cuts in all different shapes and sizes that you can buy as well. Here's how it works...

It's so easy! After I got enough navy and white tumblers I started sewing them together like so.


Once each strip was finished, I sewed all the strips together. All together it was eight across and seven wide. It was a little tricky to get the colors to line up exactly, but luckily it didn't end up too wonky.

For the other side of the pillow, I decided to do classic nautical stripes. I cut strips of fabric about 1 1/2 inches wide and sewed them together. I don't have any pictures of this process, but it's pretty self explanatory.

I ironed all of the seams flat before I turned it inside out leaving a good sized open seam to stuff the pillow in. Then I stitched it up by hand after the pillow was inside.

I like the tumbler side of it, but I really like the stripes. I think I must have a thing for stripes too. I mean, I already have two green striped pillows! Who needs any more? I do. That's who.


And it even looks pretty good with my new Wing Back Lady. Have you sewed any pillows lately? Or is it just me? Pillow lady... just add it to the list along with crazy dog lady. :)

Wednesday, October 26, 2011

Pillow Talk

My mom finally gave me her old sewing machine so I got right to work. I've had about 3-4 pillow forms laying around for years just waiting to be covered in some fun bright fabric. Plus, I decided to change out a few existing pillow cases. 

Check out this old beauty.

I love the old case it came in. However, me and my new machine (I call her Regina) were not instant friends. We should have been, but things didn't really work out that way. I spent a good hour trying to figure out why the tension wasn't working. The top stitch was too tight, the bottom too loose. I tried adjusting everything and it just wasn't working out. Finally, I called in the husband and we he ended up basically taking the thing apart to clean out the 20+ years of dust in there. After that, she worked like a charm.

I'm glad I started with some old ugly scrap fabric my mama gave me (thank, mom!) because it definitely took me a while to figure out. But once I did, we were moving. 

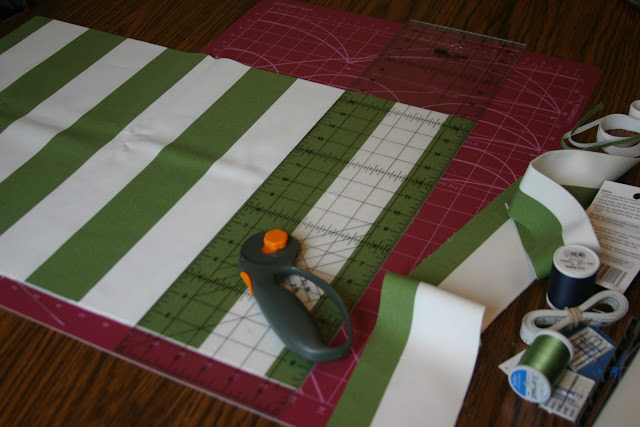
Cut the fabric (I made sure to line up the stripes).


Sew the fabric (sewing was just like riding a bike... it was a little hard to "ride" in a straight line at first though).

Leave an opening to stuff in the pillow.

Iron the edges and trim if needed so they will lay flat. Cut the corners off so they don't get bulky.


And then you have yourself some purty pillows...

...that you now must hand stitch shut. I'm digging the bold green stripes and the navy floral pattern (I even have another project coming up with the same navy pattern too!). 

I love that pillows are so easy to change (especially if you make true slip covers instead of actually sewn in covers like I did) and can really brighten up and bring color to a room. 

Have you sewn any pillow covers lately? How about any other sewing projects that are an easy fix to add a little character to a room?

LinkWithin

Related Posts Plugin for WordPress, Blogger...